A low-prep science, art, and storytelling lesson for kindergarten through grade 3. Choose the pathway that fits your learners, then explore with a light, a wall, and simple shapes.
Choose your classroom to begin:
Tell your learners: “We will find out how to change a shadow, then use it to tell a story.”
Prepare the room
Allow 5 minutes to set up after printing and gathering equipment. Test a visible shadow before learners arrive.
The core time covers a short demonstration, practice, partner storytelling, and oral reflection. Drawing, station rotations, whole-class performances, and investigations need additional time. Student sheets are optional recording tools, not a completion checklist.
Safety and comfortable participation
Use cool LED lights only; do not use candles, lasers, or hot lamps.
Keep beams below eye level and never shine a light into anyone’s eyes.
Secure sheets, cords, and stands; keep walking paths clear.
Use cool LED lights only; do not use candles, lasers, or hot lamps.
Keep beams below eye level and never shine a light into anyone’s eyes.
Secure sheets, cords, and stands; keep walking paths clear.
An adult handles reflective materials and redirects stray reflections.
Assess noticing and explaining, not dexterity, handwriting, or acting. Learners can point, draw, speak, sign, or demonstrate.
Offer maker, narrator, light watcher, observer, and recorder roles.
Allow seated participation and tabletop screens.
Accept spoken, drawn, pointed-to, signed, or demonstrated responses.
Let students use cardstock figures if a hand pose is uncomfortable.
Demonstrate on your own hand; do not force or reposition a child’s fingers.
Predict first. Move the card, then compare the shadow with your prediction.
Fixed lightMove cardFixed screen
Near light: largerNear screen: smaller
Object: Middle. The shadow is medium-sized. Only the object moved; the light and screen stayed fixed.
Whole-class theater
Use one light and screen so everyone can observe the same demonstration.
Aim one cool LED light at a wall or taut sheet.
Mark a performer spot and audience line. Use a few volunteers; seated partners predict, practice shapes, and plan stories.
Do not queue every pair in the core lesson. Offer later supervised center turns so everyone can test a shadow.
Small-group stations
Best when several safe light sources and adult sightlines are available.
Prepare one light and vertical screen per group of 3–4 before teaching.
Combine roles as needed: maker, narrator, observer. An adult checks light safety.
Work simultaneously. Swap maker after each try; add time for full rotations.
Kindergarten: notice, explore, tell
A 20-minute pathway with an open hand, relaxed fist, or cardstock shape. Animal poses are optional; children can point, draw, speak, sign, or demonstrate.
Notice that a hand or object can block light.
Explore how moving or turning a shape changes its shadow.
Share a short story with a partner.
3 min · Notice
What do you notice on the wall?
Teacher: Show a card shadow. Point out the light, card, and wall.
Children: Point to the shadow and tell a partner what you see.
Children point to or describe a shadow.
4 min · Try a change
Predict: what will happen when I put a card in the light? Try it. What did you notice?
Teacher: Show the lit wall, then put a card in the beam. Ask before trying.
Children: Say or show what you think will happen, then what you saw.
Optional recording: page 5. Use oral responses during the core lesson; draw afterward.
The card blocks light; its shadow appears on the screen.
6 min · Explore shapes
What changes when you turn your hand or card?
Teacher: Model one slow turn. Use volunteers at one light or pairs at prepared stations.
Children: Try or watch one change. Seated partners practice a comfortable shape together.
Children explore an open hand, relaxed fist, or cardstock shape.
4 min · Tell a tiny story
First it arrives. What happens next?
Teacher: Model First, Next, Last. Include the shadow change you just explored.
Children: Tell a partner a tiny story; turn a shape to show a change. Swap storyteller.
Optional recording: page 6. Use oral responses during the core lesson; draw afterward.
Partners move a shape and tell, sign, or act out a story.
For example: First, a card character hides edge-on. Next, it turns to face the light and appears. Last, it turns edge-on and hides again.
3 min · Share a discovery
Show one thing you found out.
Teacher: Invite two discoveries and listen to partner responses.
Children: Show one change: I turned ___. I saw ___.
Children point, draw, speak, sign, or demonstrate.
Start with simple shapes
An open hand
Hold your hand comfortably in the light. Turn it slowly. What changes on the screen?
A relaxed fist
Curl your fingers gently. Turn the rounded side toward the light. Move your shape slowly across the screen.
A cardstock shape
Hold a teacher-prepared circle, triangle, or other shape in the beam. Turn it edge-on, then turn it back. What do you notice?
Try an optional Turtle or Dog
Turtle: Move the shell slowly forward with a tiny bob.
Dog: Tilt the head, then move the little finger to open and close the mouth.
Children may choose either animal or continue with an open hand, relaxed fist, or cardstock shape. Assess what they notice, not whether the animal is perfect.
Evidence of learning
Points to the light, object, or shadow.
Shows or describes one change they noticed.
The 30-minute core lesson
STEP 1
4 min
Notice a shadow
Ask: What has to be present for this shadow to appear?
Teacher: Show a card shadow; remove the card and compare.
Children: Point out the light, object, screen, and shadow.
Expected observation: Identify a light, an object in its path, and a screen.
STEP 2
6 min
Change one position
Ask: Predict what will change when this card moves toward the light. Keep the light and wall still. Try it, then compare with your prediction.
Teacher: Move a rigid card toward the light without turning it. Keep light and screen fixed.
Children: Predict aloud, watch, then compare with a partner.
Optional recording: page 7. Oral responses fit the core time.
Expected observation: The shadow grows as the card moves toward the fixed light.
STEP 3
8 min
Build a figure
Ask: Choose one comfortable figure or shape. Which small turn makes its outline easiest to recognize?
Teacher: Demonstrate one shape. Use volunteers or prepared stations; offer the cards as choices.
Children: Choose one shape, not all five. Try or observe one slow turn.
Expected observation: Turning the shape changes its outline. Comfortable shapes count.
STEP 4
8 min
Create a tiny story
Ask: What does your character want, what changes, and how does the scene end?
Teacher: Model a three-part story using a shadow change. Invite one brief demonstration.
Children: Rehearse with a partner or group. Use a turn or size change in the story.
Optional recording: page 9. Oral responses fit the core time.
Expected observation: Groups use movement, speech, or signing to show first, next, and last.
For example: First, a card character hides edge-on. Next, it turns to face the light and appears. Last, it turns edge-on and hides again.
STEP 5
4 min
Share evidence
Ask: What did you change, and what happened to the shadow?
Teacher: Ask the exit questions aloud. Listen for what changed and what was observed.
Children: Point to the setup and say: I changed ___. I noticed ___.
Optional recording: page 10. Oral responses fit the core time.
Expected observation: Use an observed shadow change to explain an idea.
Show figure directions and tutorials
Five classroom figures
Each pose includes steps, one expressive movement, troubleshooting, and the exact full tutorial.
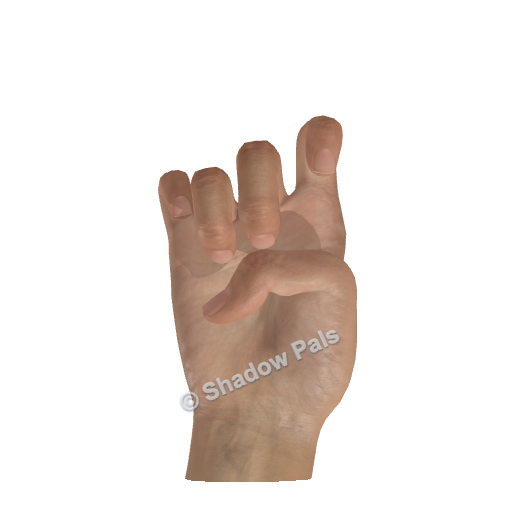
One-hand shell pose. Keep the fist comfortable, not tightly clenched.
Turtle
Curl all four fingers into one relaxed, rounded fist.
Fold the thumb close to the fingers so it does not stick out.
Turn the rounded side toward the light to make a compact shell silhouette.
Move: Move the shell slowly forward with a tiny bob.
Troubleshoot: If the shell looks jagged, relax the knuckles and tuck the thumb closer. This simple pose shows a shell, not separate legs or a head.
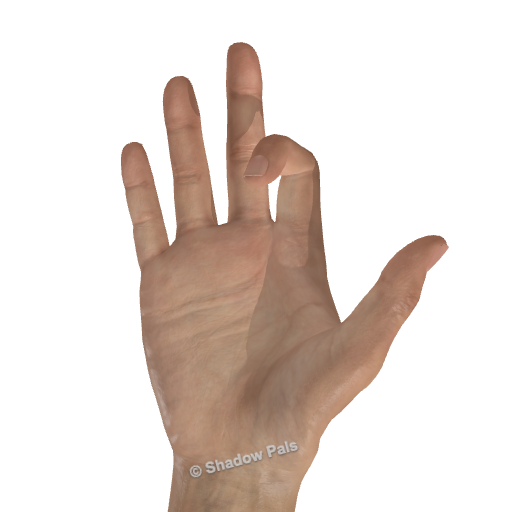
Keep the middle and ring fingers touching. The gaps shown here are an illustration limitation, not part of the pose. Move only the little finger to open the mouth.
Dog
Hold the fingers together and bend the index finger to shape the snout.
Raise the thumb for the ear. Keep the middle and ring fingers together; the little finger forms the lower jaw.
Turn the hand sideways to the light until the ear and snout read as a dog.
Move: Tilt the head, then move the little finger to open and close the mouth.
Troubleshoot: If the muzzle disappears, turn the wrist slightly; keep the thumb ear above the snout.
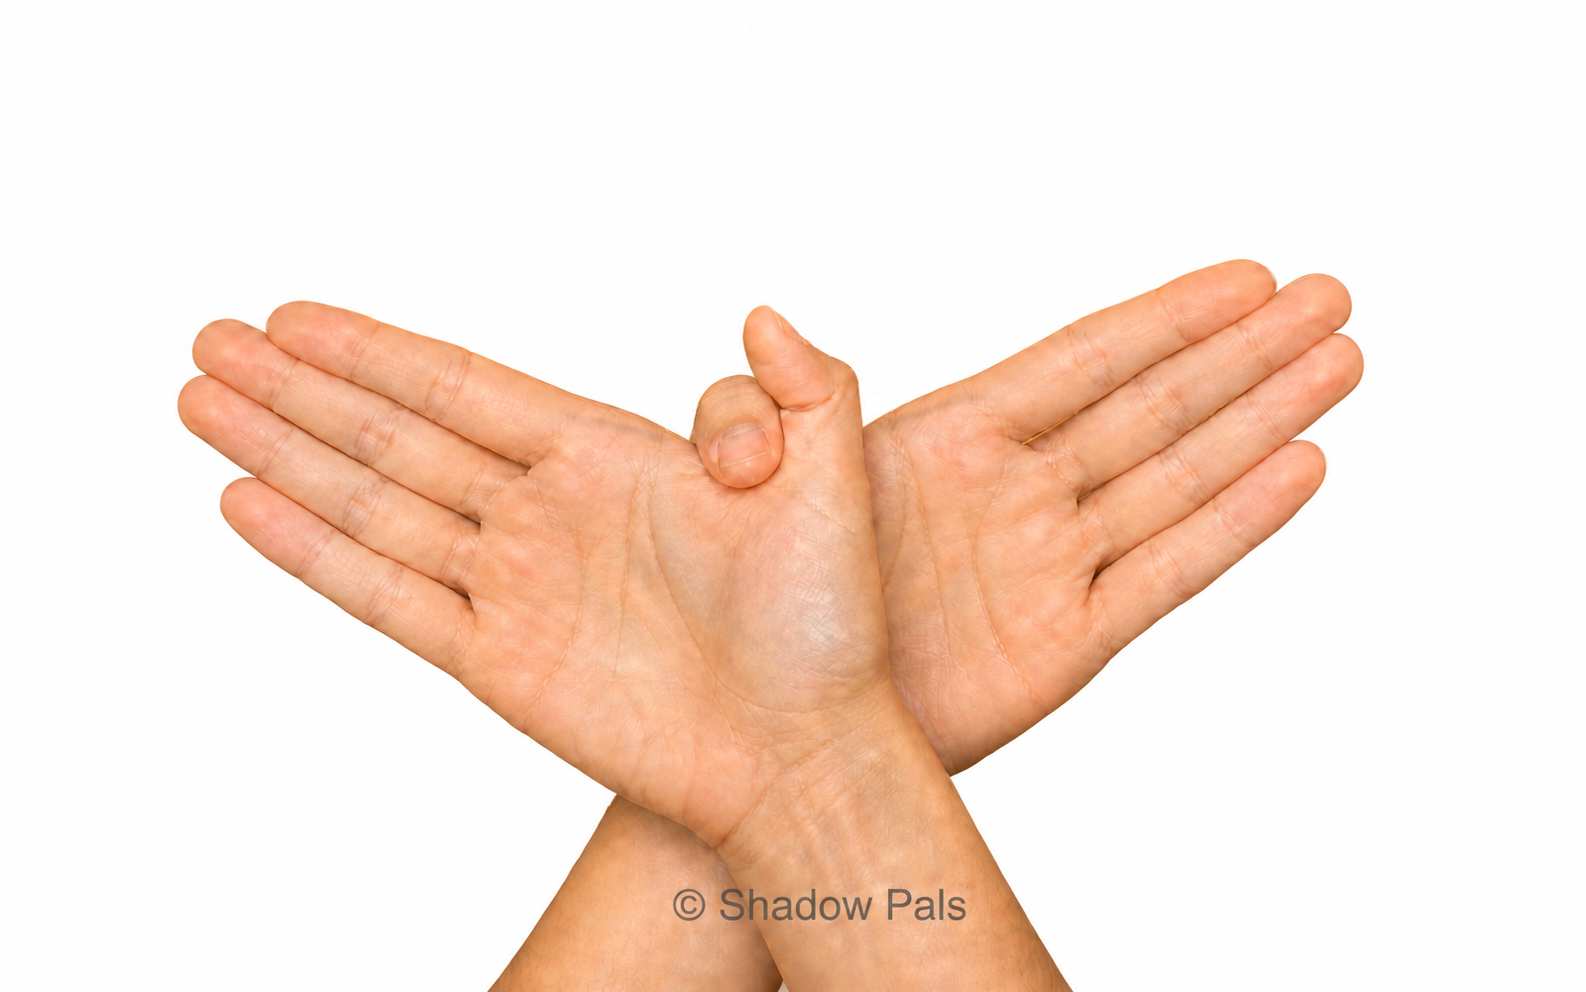
The Bird card shows an AI-generated pose illustration. Its instructions call out the palm, finger, wrist, and thumb positions so students can make the shape safely.
Student pages: draw, tell, or show
Draw, tell, or show your discovery
Read prompts aloud and model each activity. Accept telling, pointing, signing, or showing. After exploring, choose one optional recording page or none; an adult can scribe. Independent reading, names, spelling, sentences, and recognizable drawings are not required. Predict what will happen when a card enters the beam, then tell or show what happened.Use paper or respond aloud. Before moving the object, make a prediction; afterward, describe what you noticed. Grade 3 learners can use the measurement investigation in Extend as a separate session.
Tell or act out a tiny story
First / Next / Last story planner
Work with a partner or small group. Share one planner and take turns adding ideas.
First: who arrives?
Next: what happens?
Last: how does it end?
Use one shadow change in your story. Tell, sign, or act it out first; draw later if useful. A narrator can help.
Take turns: make and notice
Make: try a shape or move the card.
Notice: watch and share what changed. Swap turns.
Choose or rotate roles
Maker: holds or moves a shape
Narrator: tells or signs the story
Light watcher: checks fixed positions
Observer: notices a clear movement
Recorder: draws or writes a discovery
Try it together
Our shape moves slowly enough to follow.
Our story has a first, next, and last.
Everyone has a way to take part.
Share a discovery
Exit ticket
Show or describe one shadow you noticed. Point, draw, tell, or sign what changed.
Point to or draw the light, object, and shadow.
What did you change? What did you notice?
What blocked the light? Show or tell.
Teacher answer notes and differentiation
Identifies the lamp, card or hand, and shadow on the screen. Follow up: point to the object, then its shadow.
For example, I moved the card toward the light and its shadow grew. Follow up: what stayed still? Accept other observed changes.
The card or hand blocked the light. Follow up: remove it and ask what happens on the screen.
Kindergarten
Begin with an open hand, relaxed fist, or cardstock shape.
Accept pointing, drawing, speaking, signing, or demonstration.
Let an adult scribe; animal poses are optional.
Grades 1–2
Use oral predictions and labeled drawings.
Offer sentence frames: “I moved ___. The shadow ___.”
Practice one figure and one movement.
Grade 3
Measure three marked positions.
Record object-to-screen distance and shadow width in the same units.
Write a claim that names the changed variable and evidence.
Access and participation
Use large-print cards and high-contrast outlines.
Offer a partner to shape cardstock or point to choices.
Reduce visual clutter by presenting one card at a time.
Describe every demonstration aloud.
Print-ready classroom kit
Your lesson, ready to print
Read the lesson on this page. Download the matching PDF for reliable page breaks, offline use, and classroom copying.
Extend and understand
Teacher background, optional investigations, and ideas for another day.
Compare soft and sharp shadow edges
Change one thing. Notice what happens.
Compare shadow edges
A schematic comparison, not a measured prediction. Try the same comparisons with a real light and screen.
Change only the emitting area
Keep the source center, object, and screen fixed. A larger emitting area sends light toward the object from more positions.
Small emitting area: clearer edge. The source center, object, and screen stayed fixed. This schematic compares emitting area, not beam focus.
Science background and sources
What the shadows can show us
A shadow forms where an object blocks light from reaching a surface.
How does the material in the beam change the light pattern on the screen?
Transparent
clear plastic sheet
Translucent
wax paper or tracing paper
Opaque
cardstock or a book
Keep the light, screen, and test spot fixed.
First observe the screen with nothing in the beam. Use this as your comparison.
Predict, then test one material at a time in the same spot.
Draw or write what you notice. Compare with the empty beam before naming material groups.
Standards boundary: This investigation supports, but does not by itself fully align to, NGSS 1-PS4-3 by asking students to compare how different materials interact with a beam of light.
Teacher-managed reflection
Teacher demonstration: use foil or a small mirror to redirect light toward a second card, away from faces. A reflective material may also be opaque: reflection and transmission describe different behaviors.
Grade 3 measurement extension
How does the shadow’s width change as the object moves away from the screen and toward the fixed light?
For a separate Grade 3 session, use a rigid card and pretest a clear-edged shadow. Model measuring from card to screen and across the shadow’s widest width before students record three positions.
Keep the light and screen fixed. Move the same upright card to three marked positions without turning it. At each, measure card-to-screen distance and the shadow’s widest width in centimeters. Repeat a surprising measurement.
Change one variable
object-to-screen distance
Keep these fixed
same light source and brightness
same object and orientation
same screen position
same measurement method
Vocabulary and common misconceptions
Words to explore
light source
Something that gives off light.
shadow
A darker area where light is blocked.
silhouette
The filled-in outline of a shape.
light source
Something that gives off light.
shadow
A darker area where light is blocked.
opaque
Does not let visible light pass through.
translucent
Lets light through but scatters it, so a clear view is lost.
transparent
Lets light through clearly, with little scattering. It can be tinted.
reflective
Sends light back in a new direction.
silhouette
The filled-in outline of a shape.
Common misconceptions
Instead of: A shadow is a thing that follows you.
Teach: A shadow is an area receiving less light because an object blocks the light path.
Instead of: A shadow is a thing that follows you.
Teach: A shadow is an area receiving less light because an object blocks the light path.
Instead of: Dark objects make shadows; light objects do not.
Teach: Any material that blocks enough light can form a visible shadow.
Instead of: Closer always means bigger.
Teach: Name what is closer to what. In our fixed light-and-screen setup, the object’s distance from the light changes projected size.
Instead of: Every shadow has a perfectly sharp edge.
Teach: The light source’s geometry affects edge softness; compare sources while keeping the object and screen fixed.
Open-ended preschool exploration, observation, reflection, and shadow storytelling.
Resource version 1.0.0. This lesson kit is not a complete or independently validated curriculum.
NGSS 1-PS4-3 supporting connection: The materials investigation supports this expectation; it is not a full alignment claim. The indoor lesson does not assess kindergarten’s sunlight-warming expectation, K-PS3-1.
More from Shadow Pals
Prepare your space, support young learners, or try the next activity with these teaching guides.
Blurry edges, shaky shadows, hand cramps, and performance nerves. Fix common shadow puppetry problems quickly.
Educators may copy this packet for their own classes and those students’ families. Keep the credits. No resale or public rehosting. This permission does not cover third-party resources.
Shadow Pals · Light, Shadows & StoryKindergarten
Teacher copy
Light, Shadows & Story
Kindergarten · 20 minutes · 5-minute prep
Tell your learners: “We will find out how to change a shadow, then use it to tell a story.”
Allow 5 minutes to set up after printing and gathering equipment. Test a visible shadow before learners arrive.
The core time covers a short demonstration, practice, partner storytelling, and oral reflection. Drawing, station rotations, whole-class performances, and investigations need additional time. Student sheets are optional recording tools, not a completion checklist.
Gather
□ One cool LED flashlight or lamp
□ A plain wall or securely clipped white sheet
□ Figure cards and student pages from this packet
□ Pencils and clipboards or firm writing surfaces
□ Teacher-prepared cardstock shapes
Keep everyone safe
□ Use cool LED lights only; do not use candles, lasers, or hot lamps.
□ Keep beams below eye level and never shine a light into anyone’s eyes.
□ Secure sheets, cords, and stands; keep walking paths clear.
Dim the room only as needed. Keep faces out of the beam and walking routes visible.
Print once, then copy
Pages 1–4: one teacher set. Pages 5–6: student masters, grouped at the end for copying.
Choose page 5 OR page 6 for optional drawing after the lesson, or copy neither. Read prompts aloud; children can tell, point, sign, or show instead.
Print at actual size on Letter, or fit to printable area on A4. These activities work from the printed pages.
Whole-class theater
Aim one cool LED light at a wall or taut sheet.
Mark a performer spot and audience line. Use a few volunteers; seated partners predict, practice shapes, and plan stories.
Do not queue every pair in the core lesson. Offer later supervised center turns so everyone can test a shadow.
Small-group stations
Prepare one light and vertical screen per group of 3–4 before teaching.
Combine roles as needed: maker, narrator, observer. An adult checks light safety.
Work simultaneously. Swap maker after each try; add time for full rotations.
Shadow Pals · Light, Shadows & StoryKindergarten
Teacher copy
Your 20-minute exploration
Read prompts aloud and model each activity. Accept telling, pointing, signing, or showing. After exploring, choose one optional recording page or none; an adult can scribe. Independent reading, names, spelling, sentences, and recognizable drawings are not required.
3 min
Notice
Teacher: Show a card shadow. Point out the light, card, and wall.
Children: Point to the shadow and tell a partner what you see.
Ask: What do you notice on the wall?
Listen for: Children point to or describe a shadow.
4 min
Try a change
Teacher: Show the lit wall, then put a card in the beam. Ask before trying.
Children: Say or show what you think will happen, then what you saw.
Ask: Predict: what will happen when I put a card in the light? Try it. What did you notice?
Listen for: The card blocks light; its shadow appears on the screen.
Optional recording: page 5. Oral responses fit the core time.
6 min
Explore shapes
Teacher: Model one slow turn. Use volunteers at one light or pairs at prepared stations.
Children: Try or watch one change. Seated partners practice a comfortable shape together.
Ask: What changes when you turn your hand or card?
Listen for: Children explore an open hand, relaxed fist, or cardstock shape.
4 min
Tell a tiny story
Teacher: Model First, Next, Last. Include the shadow change you just explored.
Children: Tell a partner a tiny story; turn a shape to show a change. Swap storyteller.
Ask: First it arrives. What happens next?
Listen for: Partners move a shape and tell, sign, or act out a story.
For example: First, a card character hides edge-on. Next, it turns to face the light and appears. Last, it turns edge-on and hides again.
Optional recording: page 6. Oral responses fit the core time.
3 min
Share a discovery
Teacher: Invite two discoveries and listen to partner responses.
Children: Show one change: I turned ___. I saw ___.
Ask: Show one thing you found out.
Listen for: Children point, draw, speak, sign, or demonstrate.
Shadow Pals · Light, Shadows & StoryKindergarten
Teacher copy
Start with simple shapes
An open hand
Hold your hand comfortably in the light. Turn it slowly. What changes on the screen?
A relaxed fist
Curl your fingers gently. Turn the rounded side toward the light. Move your shape slowly across the screen.
A cardstock shape
Hold a teacher-prepared circle, triangle, or other shape in the beam. Turn it edge-on, then turn it back. What do you notice?
Optional animals to try
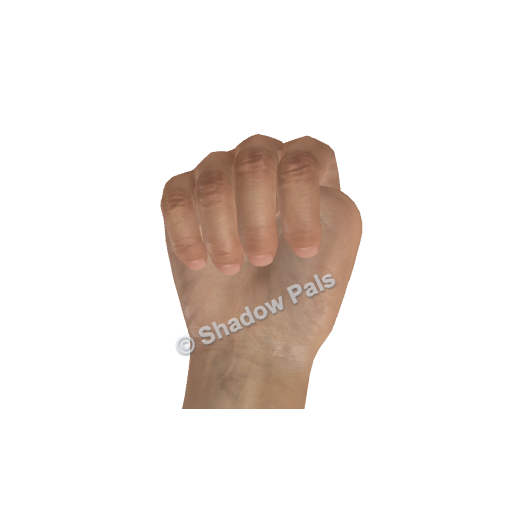
Turtle
Curl all four fingers into one relaxed, rounded fist.
Fold the thumb close to the fingers so it does not stick out.
Turn the rounded side toward the light to make a compact shell silhouette.
Try a movement: Move the shell slowly forward with a tiny bob.
Check the outline: If the shell looks jagged, relax the knuckles and tuck the thumb closer. This simple pose shows a shell, not separate legs or a head.
One-hand shell pose. Keep the fist comfortable, not tightly clenched.
Dog
Hold the fingers together and bend the index finger to shape the snout.
Raise the thumb for the ear. Keep the middle and ring fingers together; the little finger forms the lower jaw.
Turn the hand sideways to the light until the ear and snout read as a dog.
Try a movement: Tilt the head, then move the little finger to open and close the mouth.
Check the outline: If the muzzle disappears, turn the wrist slightly; keep the thumb ear above the snout.
Dog tutorial shadowpals.com/explore/how-to-make-a-hand-shadow-dog
Keep the middle and ring fingers touching. The gaps shown here are an illustration limitation, not part of the pose. Move only the little finger to open the mouth.
Let children choose either pose—or stay with a simple shape. Making a recognizable animal is not the learning goal.
Shadow Pals · Light, Shadows & StoryKindergarten
Teacher copy
Notice learning, welcome every child
Look for
□ Points to the light, object, or shadow.
□ Shows or describes one change they noticed.
Make room for every learner
□ Begin with an open hand, relaxed fist, or cardstock shape.
□ Accept pointing, drawing, speaking, signing, or demonstration.
□ Let an adult scribe; animal poses are optional.
□ Use large-print cards and high-contrast outlines.
□ Offer a partner to shape cardstock or point to choices.
□ Reduce visual clutter by presenting one card at a time.
□ Describe every demonstration aloud.
Assess what children notice about light, not handwriting, finger dexterity, or performance. Model on your own hand; never force or reposition a child’s fingers.
Words to explore
light source
Something that gives off light.
shadow
A darker area where light is blocked.
silhouette
The filled-in outline of a shape.
Teacher science notes
A shadow forms where an object blocks light from reaching a surface.
Keep the light and screen fixed. Moving the object toward the light makes its shadow larger; toward the screen makes it smaller.
Turning an object changes the outline facing the light, changing its silhouette.
A shadow is an area receiving less light because an object blocks the light path.
Educators may copy this packet for their own classes and those students’ families. Keep the credits. No resale or public rehosting. This permission does not cover third-party resources.
This indoor lesson explores shadows, not sunlight warming. It does not assess K-PS3-1. This is a lesson kit, not a complete or independently validated curriculum.
Student pages support drawing or teacher scribing. A child may instead explain, point, sign, or demonstrate a discovery.
Shadow Pals · Light, Shadows & StoryKindergarten
Individual student copy · draw & share
Predict, try & notice
Tell or show first. Drawing is optional.
Adult: show the lit wall. Ask for a prediction BEFORE putting the card in the beam. Then add the card and ask what happened. Keep the light and wall still.
I think…
What will happen? Tell, point, or show.
I saw…
What happened? Tell, point, or show. You may draw it here.
An adult may write your words. You do not need to write your name or a sentence.
Shadow Pals · Light, Shadows & StoryKindergarten
Shared student copy · one per pair
Our tiny shadow story
Tell, sign, or act out a story together.
Adult: model a short story with a shadow change. Read one prompt at a time.
First: who arrives?
Next: what happens?
Last: how does it end?
Choose one moment
Show what your shadow did. If you want, draw one moment here.
An adult may write your words. Telling or showing your story is enough.
Shadow Pals · Light, Shadows & StoryGrades 1–3
Teacher copy
Light, Shadows & Story
Grades 1–3 · 30 minutes · 5-minute prep
Tell your learners: “We will find out how to change a shadow, then use it to tell a story.”
Allow 5 minutes to set up after printing and gathering equipment. Test a visible shadow before learners arrive.
The core time covers a short demonstration, practice, partner storytelling, and oral reflection. Drawing, station rotations, whole-class performances, and investigations need additional time. Student sheets are optional recording tools, not a completion checklist.
Gather
□ One cool LED flashlight or lamp
□ A plain wall or securely clipped white sheet
□ Figure cards and student pages from this packet
□ Pencils and clipboards or firm writing surfaces
□ Teacher-prepared cardstock shapes
□ Optional: transparent plastic, wax paper, cardstock, and teacher-managed foil or mirror
□ Optional: ruler or tape measure for the grade 3 extension
Keep everyone safe
□ Use cool LED lights only; do not use candles, lasers, or hot lamps.
□ Keep beams below eye level and never shine a light into anyone’s eyes.
□ Secure sheets, cords, and stands; keep walking paths clear.
□ An adult handles reflective materials and redirects stray reflections.
Dim the room only as needed. Keep faces out of the beam and walking routes visible.
Print once, then copy
Pages 1–6: one teacher set. Pages 7–10: student masters, grouped at the end for copying.
Copy page 7 for each student. Copy page 8 for each student doing the optional investigation. Copy page 9 for each pair or group. Copy page 10 for each student.
Print at actual size on Letter, or fit to printable area on A4. These activities work from the printed pages.
Whole-class theater
Aim one cool LED light at a wall or taut sheet.
Mark a performer spot and audience line. Use a few volunteers; seated partners predict, practice shapes, and plan stories.
Do not queue every pair in the core lesson. Offer later supervised center turns so everyone can test a shadow.
Small-group stations
Prepare one light and vertical screen per group of 3–4 before teaching.
Combine roles as needed: maker, narrator, observer. An adult checks light safety.
Work simultaneously. Swap maker after each try; add time for full rotations.
Shadow Pals · Light, Shadows & StoryGrades 1–3
Teacher copy
Your 30-minute lesson
4 min
Notice a shadow
Teacher: Show a card shadow; remove the card and compare.
Children: Point out the light, object, screen, and shadow.
Ask: What has to be present for this shadow to appear?
Listen for: Identify a light, an object in its path, and a screen.
6 min
Change one position
Teacher: Move a rigid card toward the light without turning it. Keep light and screen fixed.
Children: Predict aloud, watch, then compare with a partner.
Ask: Predict what will change when this card moves toward the light. Keep the light and wall still. Try it, then compare with your prediction.
Listen for: The shadow grows as the card moves toward the fixed light.
Optional recording: page 7. Oral responses fit the core time.
8 min
Build a figure
Teacher: Demonstrate one shape. Use volunteers or prepared stations; offer the cards as choices.
Children: Choose one shape, not all five. Try or observe one slow turn.
Ask: Choose one comfortable figure or shape. Which small turn makes its outline easiest to recognize?
Listen for: Turning the shape changes its outline. Comfortable shapes count.
8 min
Create a tiny story
Teacher: Model a three-part story using a shadow change. Invite one brief demonstration.
Children: Rehearse with a partner or group. Use a turn or size change in the story.
Ask: What does your character want, what changes, and how does the scene end?
Listen for: Groups use movement, speech, or signing to show first, next, and last.
For example: First, a card character hides edge-on. Next, it turns to face the light and appears. Last, it turns edge-on and hides again.
Optional recording: page 9. Oral responses fit the core time.
4 min
Share evidence
Teacher: Ask the exit questions aloud. Listen for what changed and what was observed.
Children: Point to the setup and say: I changed ___. I noticed ___.
Ask: What did you change, and what happened to the shadow?
Listen for: Use an observed shadow change to explain an idea.
Optional recording: page 10. Oral responses fit the core time.
Shadow Pals · Light, Shadows & StoryGrades 1–3
Teacher copy
Science notes & teaching sources
Four ideas to teach
A shadow forms where an object blocks light from reaching a surface.
Keep the light and screen fixed. Moving the object toward the light makes its shadow larger; toward the screen makes it smaller.
At fixed distances, a larger emitting area can produce a wider partially lit edge. Beam focus alone does not determine softness.
Turning an object changes the outline facing the light, changing its silhouette.
Check a misconception
A shadow is a thing that follows you.
A shadow is an area receiving less light because an object blocks the light path.
Dark objects make shadows; light objects do not.
Any material that blocks enough light can form a visible shadow.
Closer always means bigger.
Name what is closer to what. In our fixed light-and-screen setup, the object’s distance from the light changes projected size.
Every shadow has a perfectly sharp edge.
The light source’s geometry affects edge softness; compare sources while keeping the object and screen fixed.
For a separate Grade 3 session, use a rigid card and pretest a clear-edged shadow. Model measuring from card to screen and across the shadow’s widest width before students record three positions.
Model on your own hand; never force or reposition a child’s fingers. Accept spoken, signed, drawn, or demonstrated answers. Assess science separately from dexterity and group participation.
Teacher answer notes
Identifies the lamp, card or hand, and shadow on the screen. Follow up: point to the object, then its shadow.
For example, I moved the card toward the light and its shadow grew. Follow up: what stayed still? Accept other observed changes.
The card or hand blocked the light. Follow up: remove it and ask what happens on the screen.
Standards connection
NGSS 1-PS4-3 supporting connection The materials investigation supports this expectation; it is not a full alignment claim. The indoor lesson does not assess kindergarten’s sunlight-warming expectation, K-PS3-1.
Educators may copy this packet for their own classes and those students’ families. Keep the credits. No resale or public rehosting. This permission does not cover third-party resources.
This is a lesson kit, not a complete or independently validated curriculum. Find source notes and preparation guides on the Teachers website.
Shadow Pals · Light, Shadows & StoryGrades 1–3
Teacher copy
Try a Turtle or Bird
Turtle
Curl all four fingers into one relaxed, rounded fist.
Fold the thumb close to the fingers so it does not stick out.
Turn the rounded side toward the light to make a compact shell silhouette.
Try a movement: Move the shell slowly forward with a tiny bob.
Check the outline: If the shell looks jagged, relax the knuckles and tuck the thumb closer. This simple pose shows a shell, not separate legs or a head.
Hold the fingers together and bend the index finger to shape the snout.
Raise the thumb for the ear. Keep the middle and ring fingers together; the little finger forms the lower jaw.
Turn the hand sideways to the light until the ear and snout read as a dog.
Try a movement: Tilt the head, then move the little finger to open and close the mouth.
Check the outline: If the muzzle disappears, turn the wrist slightly; keep the thumb ear above the snout.
Dog tutorial shadowpals.com/explore/how-to-make-a-hand-shadow-dog
Keep the middle and ring fingers touching. The gaps shown here are an illustration limitation, not part of the pose. Move only the little finger to open the mouth.
Shadow Pals · Light, Shadows & StoryGrades 1–3
Teacher copy
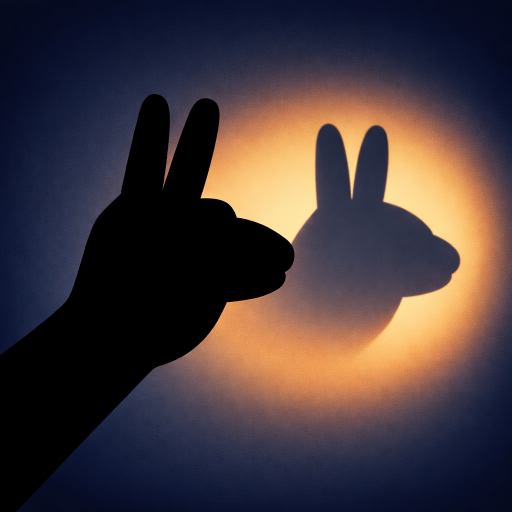
Rabbit: an optional challenge
For learners ready to try a more coordinated pose. Choose another shape if this feels uncomfortable; the science and story goals stay the same.
Rabbit
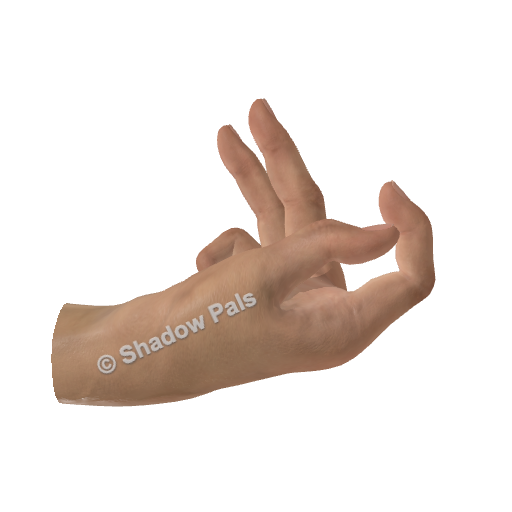
Curl the index finger toward the thumb to make the head loop.
Raise the middle and ring fingers as ears; tuck the little finger into the palm.
Turn the hand sideways to the light until the loop and both ears show.
Try a movement: Make one ear listen, then let the rabbit nibble.
Check the outline: If the head looks like a fist, separate the ear fingers and turn the wrist slightly sideways.
Thumb-side view: look for the head loop and two ears.
Rehearse, then share
First, a card character hides edge-on. Next, it turns to face the light and appears. Last, it turns edge-on and hides again.
Assess collaboration separately: did each learner have a way to contribute?
Use one shadow change in your story. Tell, sign, or act it out first; draw later if useful. A narrator can help.
The Bird illustration was created with AI. Other hand references use Shadow Pals’ first-party pose model.
Shadow Pals · Light, Shadows & StoryGrades 1–3
Individual student copy · draw & share
Predict, try & notice
Name:
Move the object. Keep the light and screen still.
I think…
I saw…
Draw, tell, point, or show what changed.
Grade 3 only: optional investigation
Grades 1–2: stop here. Tell a partner what changed.
Keep the light and screen fixed. Move the same upright card to three marked positions without turning it. At each, measure card-to-screen distance and the shadow’s widest width in centimeters. Repeat a surprising measurement.
Position
Card-to-screen distance (cm)
Shadow width (cm)
1
2
3
What pattern do your measurements show?
Shadow Pals · Light, Shadows & StoryGrades 1–3
Individual student copy · draw & share
Materials in the Beam
Name:
Date:
Optional follow-up: 15–20 minutes, outside the core lesson.
Keep the light, screen, and test spot fixed.
First observe the screen with nothing in the beam. Use this as your comparison.
Predict, then test one material at a time in the same spot.
Draw or write what you notice. Compare with the empty beam before naming material groups.
Material
I predict
I notice
clear plastic sheet
wax paper or tracing paper
cardstock or a book
After observing, discuss: transparent lets light through clearly; translucent scatters it; opaque blocks it.
Watch your teacher: reflected light
Teacher demonstration: use foil or a small mirror to redirect light toward a second card, away from faces. A reflective material may also be opaque: reflection and transmission describe different behaviors.
Draw where the light went in this box. Or tell your teacher where it went.
Shadow Pals · Light, Shadows & StoryGrades 1–3
Shared student copy · one per pair or group
Make a tiny shadow story
Work with a partner or small group. Share one planner and take turns adding ideas.
Names of our storytellers:
First: who arrives?
Next: what happens?
Last: how does it end?
Use one shadow change in your story. Tell, sign, or act it out first; draw later if useful. A narrator can help.
Choose or rotate roles
□ Maker: holds or moves a shape
□ Narrator: tells or signs the story
□ Light watcher: checks fixed positions
□ Observer: notices a clear movement
□ Recorder: draws or writes a discovery
Try it together
□ Our shape moves slowly enough to follow.
□ Our story has a first, next, and last.
□ Everyone has a way to take part.
Movement to try:
Shadow Pals · Light, Shadows & StoryGrades 1–3
Individual student copy · draw & share
My shadow discovery
Name:
Date:
1. Point to or draw the light, object, and shadow.
2. What did you change? What did you notice?
3. What blocked the light? Show or tell.
You can draw, tell, point, sign, or show your answer.
 Complete classroom lesson