Step 3 of 6: Proper hand positioning technique
The 5 Basic Shadowgraphy Hand Positions
Learn the five foundational hand positions that power most shadow figures, then combine them to build cleaner, faster silhouettes.
Hand Position Preview
The Building Blocks
Most complex shadow figures are built from just a few standard hand configurations. Mastering these five base positions means that when you encounter a new figure, you will recognize which building block it starts from — making every new animal or character much faster to learn.
Practice each position on its own for a minute or two before combining them. You are training muscle memory, not just shape awareness.
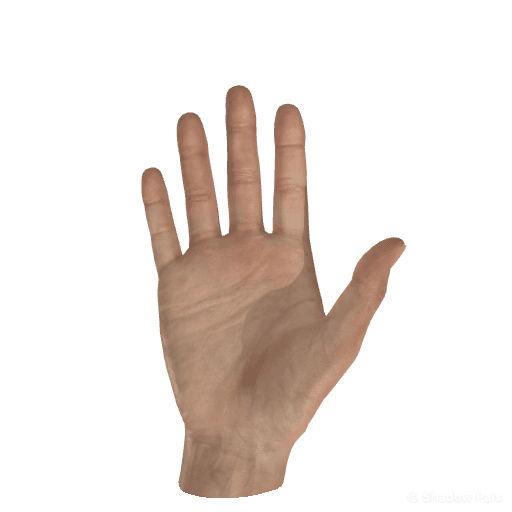
1. The Flat Palm
Used for: Bird wings, fish bodies, leaf shapes, backgrounds, any large flat surface.
Hold all five fingers straight out, pressed firmly together. This creates the maximum solid mass from your hand. Opening the fingers slightly introduces a feather or fin texture — vary finger spacing to control how much light comes through.
Variation: Cup the palm slightly (concave) to add depth and suggest a bowl or wave shape.
2. The C-Clamp
Used for: Mouths of wolves, dogs, crocodiles, talking human faces, any biting animal.
Open the thumb wide away from the four fingers — the space between thumb and fingers is the open jaw. The hinge point of the thumb (where it meets the palm) is the corner of the mouth. Bring the thumb upward to close the jaw. The tighter and more controlled this thumb hinge movement, the more expressive the mouth.
Key refinement: Keep the four fingers tight and together above the jaw. Any finger separation above reads as teeth or a broken snout.
3. The Fist
Used for: Animal and human heads, boulders, the body of a bear, any round solid mass.
A tight fist creates a round, solid silhouette. The knuckle ridge on the back of the fist can simulate a nose, brow ridge, or snout bump depending on which way you orient the hand. The thumb position against the index finger creates slightly different profiles — experiment with tuck vs. extend.
Key refinement: The difference between a dog and a bear is often just wrist tilt and which knuckle you emphasize. The fist is the most versatile base position.
4. The Fork
Used for: Rabbit ears, donkey ears, deer ears, devil horns, goat horns, dinosaur crests.
Two fingers extended, remaining fingers curled. The two most common variants:
- Index + Middle up: Rabbit or deer ears (close together, slightly curved inward at tips).
- Index + Pinky up: Bull horns, devil horns, or goat horns (wider spread, outward curve).
The gap between the two extended fingers controls ear width. A tight gap (nearly touching) reads as rabbit; a wide gap reads as horns or antennae.
5. The Interlock
Used for: Two-hand flying bird, crabs, complex human faces, eagle heads.
Fingers of one hand cross over, under, or rest on the fingers of the other. This two-hand connection creates shapes that are impossible with one hand alone. The classic example: hooking both thumbs together with palms facing outward creates the flying bird body immediately.
Challenge: Practice keeping the connection stable while moving both hands simultaneously — the coordination of maintaining the interlock under motion is the core skill of two-hand shadowgraphy.
Sources & Review
Last updated: Mar 6, 2026
Verified: May 25, 2026